Data Warehouse Connection
Connect Tidepool to your Data Warehouse
Introduction
Tidepool can connect directly to your data warehouse. When set up this way, Tidepool will read and write directly from your warehouse, never permanently storing your text data elsewhere. Loading new data into Tidepool is as simple as appending new rows to your configured data source table, and computed values from attributes you create will be written into new tables alongside all of your other warehoused data.
Tidepool currently supports Redshift, BigQuery, and Snowflake data warehouses.
Core Concepts
Data Warehouse Connections consist of a source table definition, a destination table definition, and connection resource credentials.
The source table definition lets Tidepool know which table of text data you want to index, and how to interpret each of that table's columns. Any additional unspecified columns will be treated as generic metadata columns, and will be accessible as filters and chartable measures in the app.
The destination table definition lets Tidepool know where to write results in your warehouse. For each new attribute you make, Tidepool will create a new table and write calculated values to it.
The connection resource credentials let Tidepool know how to interact with your data warehouse, and what credentials to use when connecting. To minimize load on the warehouse, Tidepool writes by first staging data in a cloud storage bucket, then triggering a data copy operation.
Configuration
You can add a warehouse connection to a project by going to the Project Settings, and selecting Warehouse Connection from the menu on the left.
The Source Table fields indicate where to pull data from, and how to interpret it.
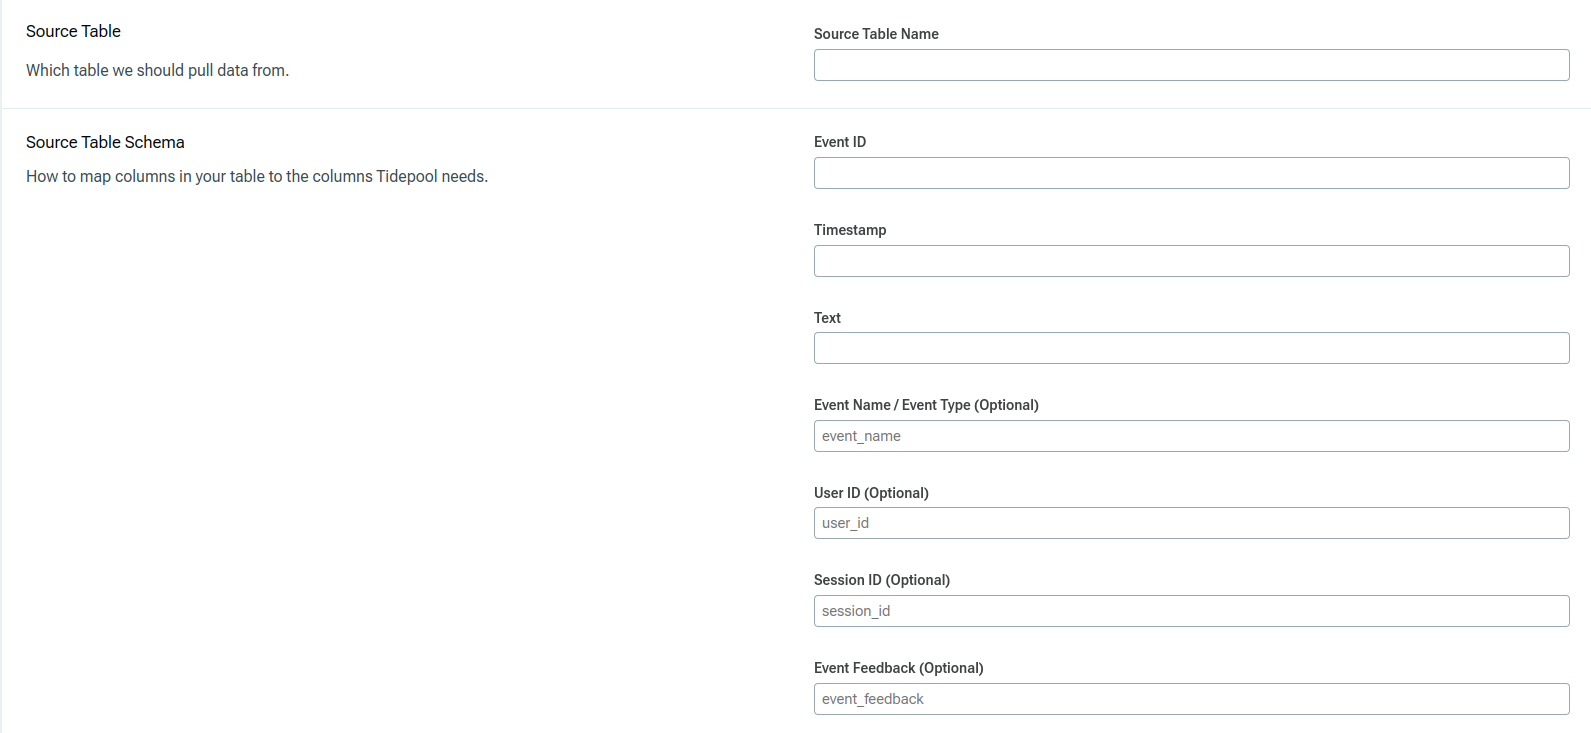
Source Table Name is the table name you want this Tidepool project to read from.
Event ID is the column name for your durable, unique string ID for each row in the table.
Timestamp is the column name for the timestamp field that you want Tidepool to index each row by.
Text is the column name for the text field that you will be analyzing in this Tidepool project.
Event Name (Optional) is the column name for the type of text in the row. For example, in a customer support scenario, you might have a "message type" column that can be either "user message" or "support agent message."
User ID (Optional) is the column name for your string ID for the primary user.
Session ID (Optional) is the column name for the string ID of the sequence or session the row belongs to. For example, in a chat scenario, you might have a "conversation id" column that links multiple individual rows together.
The Destination fields indicate where to write results to, and optionally how to name columns.
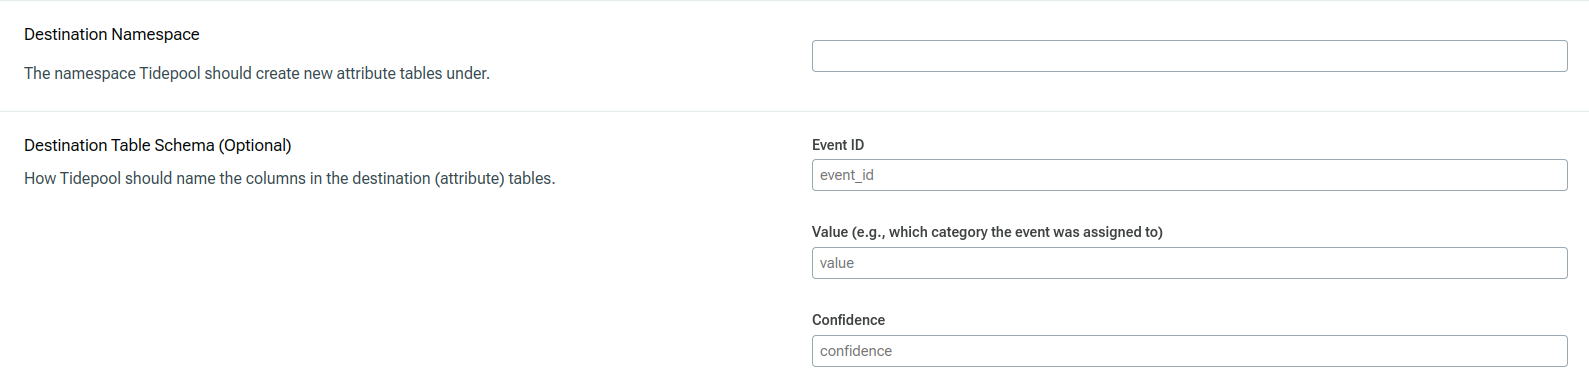
Destination Namespace is the namespace that new result tables should be created under. In Redshift, this is a schema, and in BigQuery this is a dataset.
Event ID (Optional) is the column name you want to have the row ID written under.
Value (Optional) is the column name you want to have the computed value written under.
Confidence (Optional) is the column name you want to have the row's confidence written under.
Snowflake
Permissions
You'll need to set up the following in your Snowflake instance: A user for Tidepool to perform actions as, a table for Tidepool to read from, a schema (namespace) for Tidepool to write results to, a warehouse to power Tidepool's SQL queries, and a stage for Tidepool to move data with. All data resources must be in the same database.
Here's a sample configuration:
# Create a role for Tidepool to use
create role if not exists tidepool_role;

# Provide the role with permission to use the database and a compute warehouse
grant USAGE on warehouse compute_wh to role tidepool_role;
grant USAGE on database my_data to role tidepool_role;

# Provide the role with access to your source data
grant USAGE on schema my_data.input_data to role tidepool_role;

# Option 1: Give read permissions to a specific table or view
grant SELECT on table my_data.input_data.small to role tidepool_role;

# Option 2: Give read permissions to all tables within a source schema
grant SELECT on all tables in schema my_data.input_data to role tidepool_role;
grant SELECT on future tables in schema my_data.input_data to role tidepool_role;

# Create a schema to write computed results to, in the same database as the source data.
create schema if not exists my_data.tidepool_results
grant USAGE, CREATE TABLE on schema my_data.tidepool_results to role tidepool_role;
create stage my_data.tidepool_results.writeback_stage;
grant READ, WRITE on stage my_data.tidepool_results.writeback_stage to role tidepool_role;

create user tidepool_user with password='abcd1234';
grant role TIDEPOOL_ROLE to user tidepool_user;
AWS Redshift
Database Config
You'll need three things in your Redshift database: A user for Tidepool to perform actions as, a table for Tidepool to read from, and a schema (namespace) for Tidepool to write results to.
Here's a sample configuration:
# Create a schema

select * from pg_namespace;
create schema if not exists tidepool;

# Create a materialized view to read from in that schema

CREATE MATERIALIZED VIEW tidepool.data_view AS (
    SELECT * FROM public.some_other_table
);

# Create a passwordless user and grant permissions
# This uses a user group + user to set up default permissions
# for tables and views inside of that schema.

CREATE GROUP tidepool_user_group;
GRANT USAGE, CREATE ON SCHEMA tidepool TO GROUP tidepool_user_group;
GRANT SELECT, INSERT, UPDATE, DELETE ON ALL TABLES IN SCHEMA tidepool TO GROUP tidepool_user_group;
ALTER DEFAULT PRIVILEGES IN SCHEMA tidepool GRANT SELECT, INSERT, UPDATE, DELETE ON TABLES TO GROUP tidepool_user_group;
CREATE USER tidepool_user PASSWORD disable;
ALTER GROUP tidepool_user_group ADD USER tidepool_user;
S3 Bucket
To minimize load on your Redshift cluster, Tidepool uses COPY jobs from an S3 bucket instead of direct INSERT statements. We recommend provisioning a new S3 bucket for TIdepool to stage data in when writing, with an automatic deletion lifecycle policy after 7 days.
This bucket should be in the same AWS region as your Redshift cluster.
IAM
You will need to define an IAM role with sufficient permissions to log in as that database user and to access files in that S3 bucket. A correctly configured IAM policy will look like the following:
{
    "Version": "2012-10-17",
    "Statement": [
        {
            "Sid": "LogInToCluster",
            "Effect": "Allow",
            "Action": "redshift:GetClusterCredentials",
            "Resource": [
                "arn:aws:redshift:us-west-2:466398380160:dbuser:<YOUR_CLUSTER_NAME>/tidepool_user",
                "arn:aws:redshift:us-west-2:466398380160:dbname:<YOUR_CLUSTER_NAME>/<YOUR_DB_NAME>"
            ]
        },
        {
            "Sid": "DescribeCluster",
            "Effect": "Allow",
            "Action": "redshift:DescribeClusters",
            "Resource": [
                "arn:aws:redshift:us-west-2:466398380160:cluster:<YOUR_CLUSTER_NAME>"
            ]
        },
        {
            "Sid": "ListObjectsInBucket",
            "Effect": "Allow",
            "Action": [
                "s3:ListBucket"
            ],
            "Resource": [
                "arn:aws:s3:::<YOUR_BUCKET_NAME>"
            ]
        },
        {
            "Sid": "AllObjectActions",
            "Effect": "Allow",
            "Action": "s3:*Object",
            "Resource": [
                "arn:aws:s3:::<YOUR_BUCKET_NAME>/*"
            ]
        }
    ]
}
Then, create an IAM user with that IAM policy, and create an Access Key, which you will provide during setup.
GCP BigQuery
BIgQuery Dataset
You'll need two things set up in BigQuery: a table to load data from, and a dataset (namespace) to write results to. If your data source table is not in your result dataset, you will need to ensure that the granular permissions set up for the integration additionally include read access to the source table.
GCS Bucket
BigQuery recommends loading larger amounts of data via COPY jobs from data staged in GCS.
We recommend provisioning a new GCS bucket for TIdepool to stage data in when writing, with an automatic deletion lifecycle policy after 7 days.
IAM
You will need to create a service account that has the following permissions:
- Storage Object User on the above GCS bucket
- BigQuery Job User and BigQuery Read Session User
- BigQuery Data Editor on the BigQuery Dataset you want results written to
After creating the service account, you will be able to download a JSON Key. When configuring the Tidepool integration, you will provide that JSON body as your credentials.
Updated 13 days ago