Refine Categories
Update category details and assign events to categories to improve overall event categorization within an attribute.
Prerequisites
This guide assumes you've uploaded some data and created your first attribute.
What is Category Refinement?
Once you've created an attribute, you'll enter the Refinement step. Refinement uses a set of 5,000 examples from your data to ensure proper representation of the data's diversity.
In this step, you'll have a chance to refine the definition of each category, and how you want examples to be allocated amongst categories. All categories for an attribute can be edited as-needed to include or exclude particular types of examples.
Category refinement gives you an opportunity to see how events are mapped to categories within the attribute and do any of the following:
- confirm the category is working as expected
- update the category name or description to better capture how you want examples to be assigned
- break a subset of events from the category out into one or more new categories
- remove categories to have their examples reassigned to other categories
The fundamental refinement cycle involves (1) making one or more of the above changes, then (2) regenerating the attribute, so that you can see the resulting effect on example distribution. After you're reasonably happy with the attribute's performance, you'll finalize it, which will apply it to the entire dataset, and make it available in Analyze view.
Understanding the Refinement Workflow Layout
Reference the annotated screenshot below for the five main features of the refinement workflow.

1. Category Name and Description
Since our refinement process uses LLMs to understand and assign examples to categories, your category's name and description is very important. A detailed and specific category description can be extremely powerful, often even more so than manually assigning examples.
We highly recommend updating your category's description if you feel the category is not accurately capturing what you want it to. Be sure to click Save so that the new description is taken into account during the next regeneration of the attribute.
This is also where you can delete a category (using the red trash can next to the category name), if desired.
2. Category Confidence Distribution
The confidence distribution for the category reflects how easy or hard the category is for the classifier to learn. The distribution buckets all of the samples in that category based on how confident the classifier is about them.
A category with more examples towards the right side of the distribution is a straightforward and well-understood category, while a category with more examples in the middle areas of the distribution is likely harder to learn and/or is receiving mixed information about which examples should be assigned to it. Confidence can be improved by providing more clarity in the category description about what examples do and don't belong in that category.
3. Example Table
Examples belonging to this category will be shown here. Use the search bar to filter examples by keyword, or click a bar in the confidence distribution to see only the examples belonging to that range bucket in the distribution. (Click the same bar again to go back to viewing all examples.)
To view the expanded text for an example, click the + sign at the left side of each row.
To recategorize examples from the current category to another, click the checkbox in that row, then click Categorize to change their category. Note that the examples will still be present in the table for that category until the next regeneration, but in the background they have in fact been recategorized.
4. Regenerate and Finalize
These are the two buttons you'll use to Regenerate (re-apply the classifier to the examples, to see your changes reflected) or to Finalize (decide that the attribute looks good and that you want to proceed to analysis).
5. Category List
This is the list of all categories for the attribute, and is used to navigate between categories to refine them individually. You can also add a new category from here using + New Category.
How to Iterate on Categories
The most successful attributes will have clearly-defined categories that are easy to distinguish from one another.
Categories are mutually exclusive, so if an event could plausibly belong to more than one category, the definitions are not sufficiently fleshed-out. For example, we can see here that there is overlap between the "Flights" category and the "Location" category, in that Flight examples often use two airports to describe which flight they were on, while the Location examples will also include an airport.
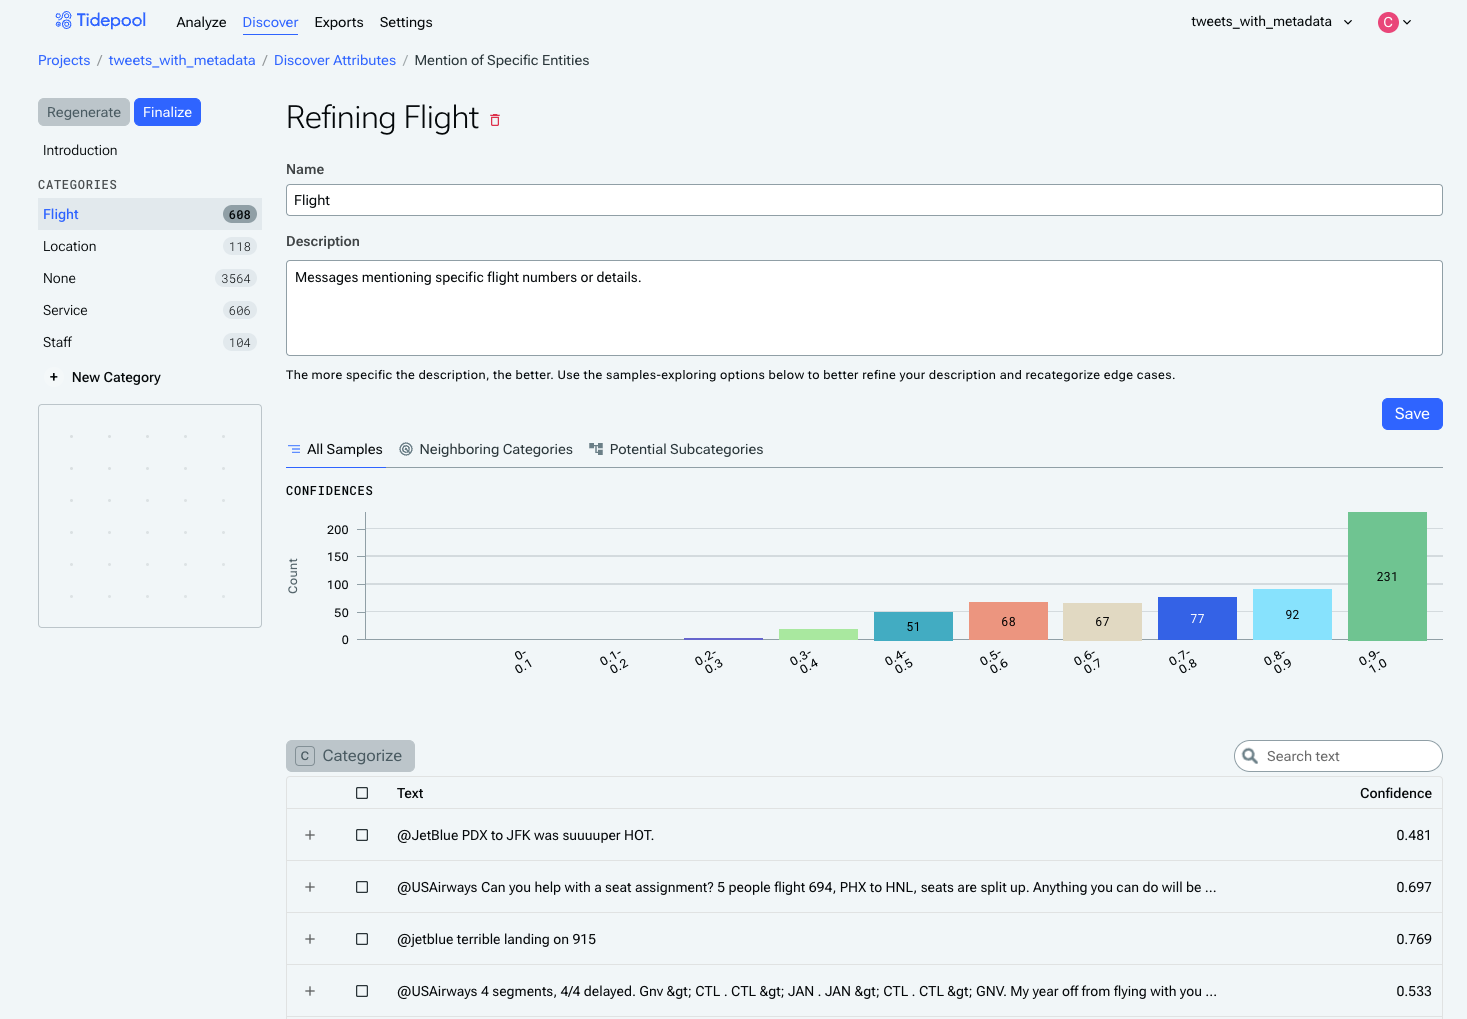
Flight, a reasonably easy category for the model to learn, based on its confidence distribution. Most examples are on the right side of the distribution.
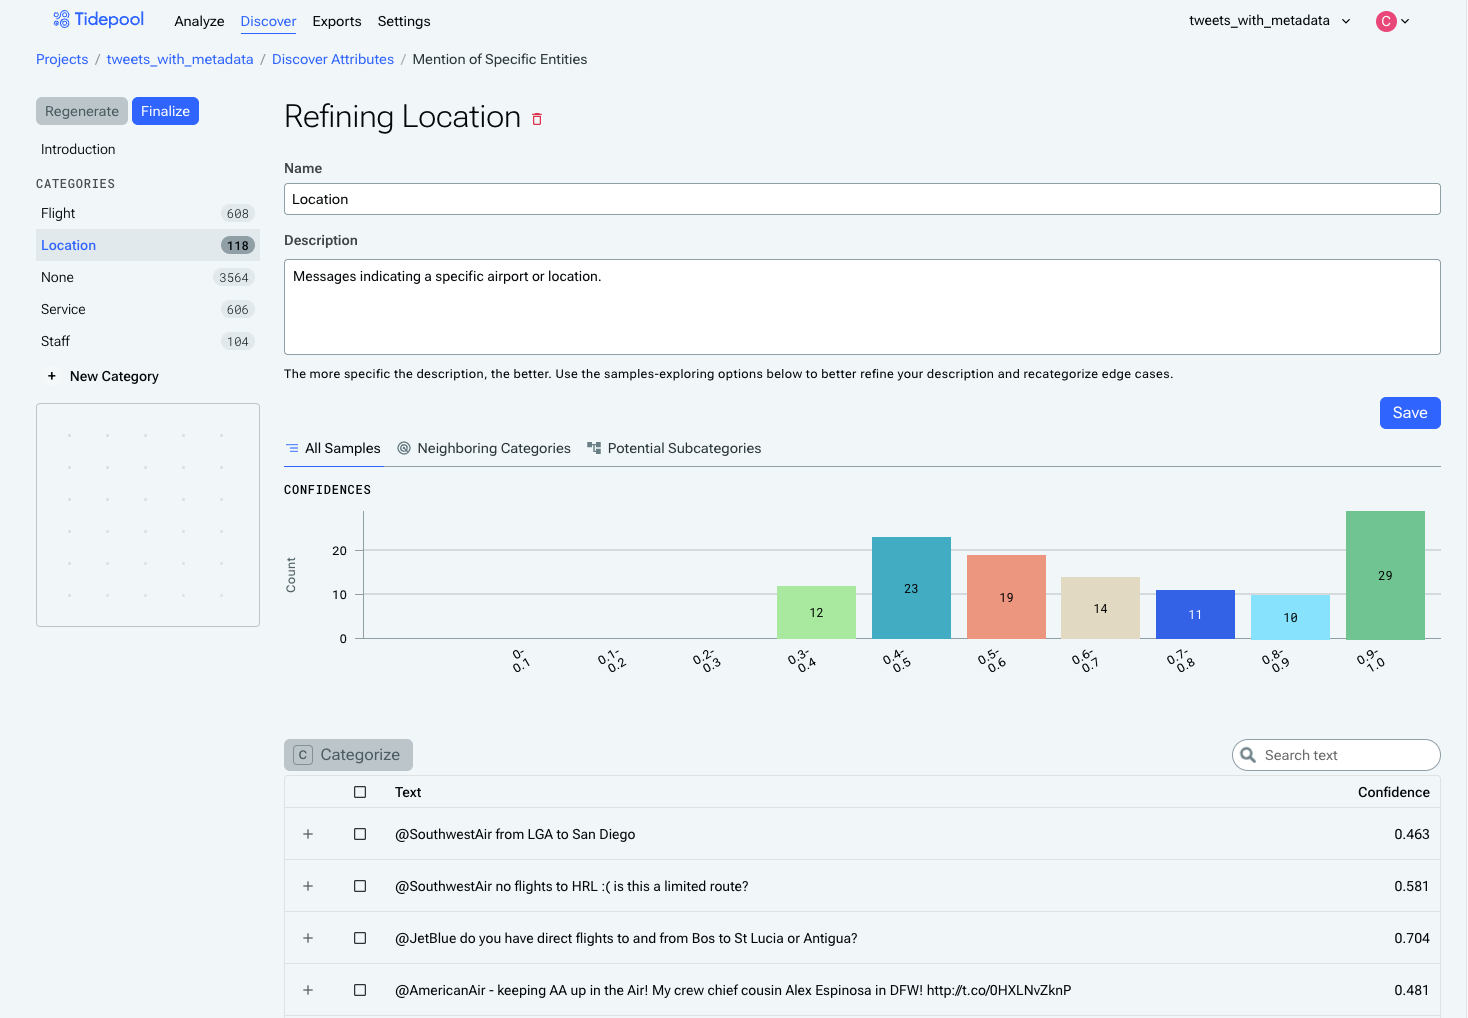
Location, a harder category for the model to learn, based on its confidence distribution. Most examples are in the middle of the distribution, meaning the model feels that many of these examples could reasonably belong in a different category.
You can reassign examples from one category to another category using the checkboxes and the Categorize button, although this should be used sparingly. It will generally provide better results if you can describe in words (using the category description) why examples should belong in that category and not another.
Under the Potential Subcategories tab, Tidepool will suggest subtopics within that category, providing the opportunity to elevate a subtopic to a proper category if it's relevant to your analysis. Click on the bar for that subcategory to filter down to just those examples, then click the checkbox at the top of the table to select all of those examples, then click Create New Category with Selected Samples.

Remember that if you elevate a subcategory to a category, you should ensure that you update its description or the original parent category's description to ensure the two are still mutually exclusive.
After making changes to categories, click Regenerate to refresh how the categories are applied to the examples, using your new instructions. If a category was deleted since the last generation, this will reassign examples that were previously assigned to the deleted category to their new likeliest category.
Remember that it's near-impossible to get a "perfect" attribute, since attribute models are backed by probabilistic classifiers. Spending more than 15-30 minutes refining an attribute is likely to have diminishing returns. If you're having trouble getting the results you want, feel free to reach out to the team and we'll help you troubleshoot.
Finalizing the Attribute
Once you've reviewed all of the categories and are happy with the results, click the Finalize Attribute button in the top left of the screen.
Finalizing the attribute will lock the attribute's categories and begin the process of calculating which category each event should be assigned to for the full dataset. Additionally, any new event data submitted to the project will automatically be categorized for all finalized events.
Updated 6 months ago
Now that you have a finalized attribute, read more about analyzing your events or sessions over time by category.